Raspberry Pi で I2C を有効化する方法を紹介します.
はじめに
2014年までの Raspbian では,/etc/modprobe.d/raspi-blacklist.conf を使って I2C の有効/無効 を切り替えるようになっていました.
しかし,2015-01-31 リリースからは,より汎用的な Device Tree という仕組みが導入されたのに伴い,I2C のペリフェラル機能の有効化方法が変わりました.
なお,この方法は Raspberry Pi2 でも有効です.
設定手順
以降では,Device Tree を使う Raspberry Pi 環境で I2C を有効化する方法を,次の 3 パターン紹介します.
- raspi-config を使う方法
- 手動で行う方法
- Fabric を使ってリモートから自動的に行う方法
raspi-config を使う方法
raspi-configを root で実行します.
1$ sudo raspi-config-
「8 Advanced Options」を選択.
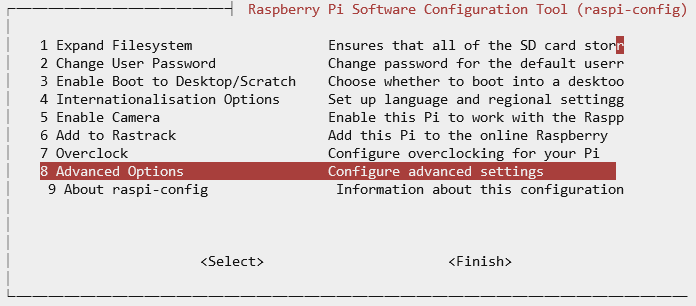
-
「A7 I2C」を選択.
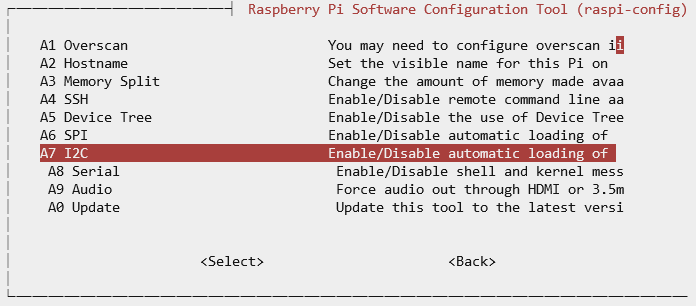
-
「はい」を選択.
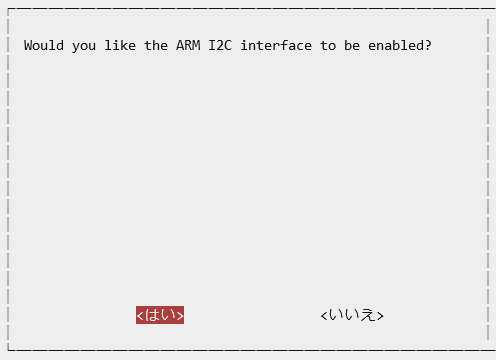
-
「はい」を選択.
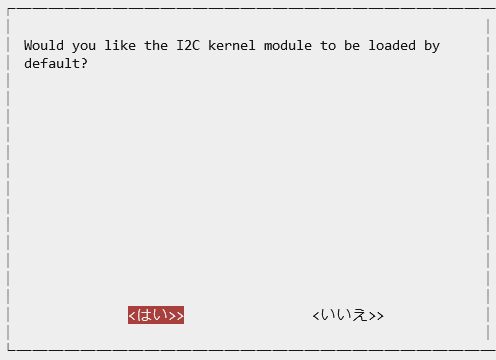
- 再起動.
1$ sudo reboot
手動で行う方法
- 「/boot/config.txt」の末尾に以下を追加.
1dtparam=i2c_arm=on - 「/etc/modules」の末尾に以下を追加.
1i2c-dev - 再起動.
1$ sudo reboot
Fabric で自動的に行う方法
次のエントリーで紹介した Fabric のレシピを使う方法について紹介します.
Fabric とCuisine による Raspberry Pi の自動セットアップ
https://rabbit-note.com/2014/12/31/fabric-cuisine-raspberry-pi-automated-setup/
以下の内容を fabfile.py というファイルに保存し,fab -H pi@raspberrypi setup を実行すれば OK です.
|
1 2 3 4 5 6 7 8 9 10 11 12 13 14 15 16 17 18 19 20 21 22 23 24 25 26 27 28 29 30 31 32 33 34 35 36 37 38 39 40 41 42 43 44 45 46 47 48 49 50 51 52 53 54 55 56 57 58 59 60 61 62 63 64 65 66 67 68 69 70 71 72 73 74 75 76 77 78 79 80 81 82 83 84 85 86 87 88 89 90 91 92 93 94 95 96 97 98 99 100 101 102 103 104 105 106 107 108 109 110 111 112 113 114 115 116 117 118 119 120 121 122 123 124 125 126 127 128 129 130 131 132 133 134 135 136 137 138 139 140 141 142 143 144 145 146 147 148 149 150 151 152 153 154 155 156 157 158 159 160 161 162 163 164 165 |
# -*- coding: utf-8 -*- import imp import os from fabric.api import run, sudo, settings from fabric.decorators import task from fabric.context_managers import hide from fabric.utils import puts import fabric.colors import cuisine @task def setup(): with settings( # hide('warnings', 'stdout', 'stderr') ): # raspi-config の自動起動を無効化 if cuisine.file_exists('/etc/profile.d/raspi-config.sh'): # NOTE: sudo() だと,raspi-config が起動してしまうので run() run('sudo rm -f /etc/profile.d/raspi-config.sh') if os.environ.has_key('RASP_HOSTNAME'): setup_hostname(os.environ['RASP_HOSTNAME']) setup_locale() setup_ssh() setup_package() setup_i2c() setup_wlan() # rootfs サイズを拡張 sudo('raspi-config --expand-rootfs') # 再起動 sudo('reboot') # タイムゾーンとロケールの設定 def setup_locale(): puts(fabric.colors.green('[Setting Locale]', True)) sudo('echo "Asia/Tokyo" > /etc/timezone') sudo('dpkg-reconfigure -f noninteractive tzdata') sudo('sed -i -e \'s/^en_GB.UTF-8 UTF-8/# en_GB.UTF-8 UTF-8/\' /etc/locale.gen') sudo('sed -i -e \'s/^# en_US.UTF-8 UTF-8/en_US.UTF-8 UTF-8/\' /etc/locale.gen') sudo('sed -i -e \'s/^# ja_JP.UTF-8 UTF-8/ja_JP.UTF-8 UTF-8/\' /etc/locale.gen') sudo('dpkg-reconfigure --frontend=noninteractive locales') # タイムゾーンとロケールの設定 def setup_hostname(hostname): puts(fabric.colors.green('[Setting Hostname]', True)) sudo('sed -i -e \'s/^.*/%s/\' /etc/hostname' % (hostname)) sudo('sed -i -e \'s/^127.0.1.1\t.*/127.0.1.1\t%s/\' /etc/hosts' % (hostname)) # 公開鍵のコピー def setup_ssh(): puts(fabric.colors.green('[Install SSH Publickey]', True)) with cuisine.mode_sudo(): cuisine.ssh_authorize("pi", cuisine.file_local_read('~/.ssh/id_rsa.pub')) # パッケージのインストール def setup_package(): puts(fabric.colors.green('[Install Packages]', True)) with cuisine.mode_sudo(): cuisine.package_update() cuisine.package_upgrade() cuisine.package_ensure([ 'gcc', 'make', 'automake', 'emacs23-nox', 'tmux', 'ruby', 'git', 'zsh', 'i2c-tools', 'lsb-release', 'mlocate', ]) # I2C の有効化 def setup_i2c(): if cuisine.file_exists('/etc/modprobe.d/raspi-blacklist.conf'): sudo('sed -i -e \'s/^blacklist i2c-bcm2708/# blacklist i2c-bcm2708/g\' ' + '/etc/modprobe.d/raspi-blacklist.conf') else: # RASPBIAN Release 2015-01-31 or later boot_conf = cuisine.text_ensure_line( cuisine.file_read('/boot/config.txt'), 'dtparam=i2c_arm=on' ) cuisine.file_write( location = '/boot/config.txt', content = boot_conf, mode='755', sudo=True ) modules_conf = cuisine.text_ensure_line( cuisine.file_read('/etc/modules'), 'i2c-dev' ) cuisine.file_write( location = '/etc/modules', content = modules_conf, mode='644', sudo=True ) # WiFi の有効化 def setup_wlan(): if not cuisine.file_exists('/sys/class/net/wlan0'): return puts(fabric.colors.green('[Setting Wireless LAN]', True)) wifi_config = None try: (file, pathname, description) = imp.find_module('wifi_config', ['.']) wifi_config = imp.load_module("wifi_config", file, pathname, description) except ImportError: puts(fabric.colors.red('SKIP WiFi Configuration. (FAILED to load wifi_config.py)', True)) return cuisine.file_write( location = '/etc/wpa_supplicant/wpa_supplicant.conf', content = 'ctrl_interface=DIR=/var/run/wpa_supplicant GROUP=netdev\n' + 'update_config=1\n' + 'network={\n' + (' ssid=\"%s\"\n' % (wifi_config.WIFI_SSID)) + (' psk=%s\n' % (wifi_config.WIFI_PSK)) + ' key_mgmt=WPA-PSK\n' + ' proto=WPA2\n' + ' pairwise=CCMP\n' + ' group=CCMP\n' + '}\n', mode='600', sudo=True ) sudo('sed -i -e \'s/^wpa-roam \/etc\/wpa_supplicant\/wpa_supplicant.conf/' + 'wpa-conf \/etc\/wpa_supplicant\/wpa_supplicant.conf/\' /etc/network/interfaces') sudo('sed -i -e \'s/^iface wlan0 inet manual/iface wlan0 inet dhcp/\' /etc/network/interfaces') # NOTE: Wifi の場合は「ホスト名-wifi」でアクセスできるようにする dhclient_conf = cuisine.text_ensure_line( cuisine.file_read('/etc/dhcp/dhclient.conf'), 'interface "wlan0" { send host-name = concat (gethostname(), "-wifi"); }' ) cuisine.file_write( location = '/etc/dhcp/dhclient.conf', content = dhclient_conf, mode='644', sudo=True ) # Local Variables: # coding: utf-8-unix # mode: python # c-basic-offset: 4 # tab-width: 4 # indent-tabs-mode: nil # End: |
参考文献
- DEVICE TREES, OVERLAYS AND PARAMETERS
- Raspberry Pi における Device Tree の設定方法について詳細に解説されています.



コメント
[…] Piで学ぶ電子工作(金丸隆志 著) ・I2Cとは? ・最近の Raspberry Pi で I2C を有効化 ・ADT7410仕様書 […]
[…] 最近の Raspberry Pi で I2C を有効化する方法 […]